Base Action Data
Setup an import specification for the "Action Import" first to import the base action data (matter name, etc) and be sure to use a unique external reference ID for each row. If you then do subsequent related imports you can use this value as the identifier.
Your action import specification will probably look something like the following:

In order to populate the 'Assigned-To Participant ID' lookup the associated contact in the Contacts list or do a Search and open up te contact record. The Contact ID is the first column in the list, or in the header area of the contact record (see below). 

Action Participants (Parties)
Make sure you have imported all the contacts first and use an external reference for each contact. You can the use the Action-Participants import spec to match on Action Import External Reference and Participant Import external Reference. No other match-up fields are required.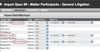
| Tip | ||
|---|---|---|
| ||
Admin > Participants > Participant Types |
Action Custom Data Import
Use the "Action – Custom Data Import" class and then specify which Data Collection you wish to import. You will need an import specification for each data collection. Use
| Tip |
|---|
You can use either the Action Import External reference or the Action ID to match the data to the correct action(s). |
| Info |
|---|
Note that the Data Collections must already be defined in ActionStep before you can import custom data. |
Boolean/Checkbox fields can use the following terms (upper or lower case) for the TRUE (checked) value:
- checked
- 1
- yes
- true
- Y
- T
- ok
- on
Anything else will be treated as FALSE.
Action File Notes
Match on Action Import External Reference and make sure the date and time formats are correct. Use one file note per row.
Be careful to remove or escape special characters such as CR/LF which may corrupt the CSV file format.