...
| Info | ||
|---|---|---|
| ||
* Fields marked with an asterisk can be specified by the user when importing the file and do not need to be included in the CSV file |
| Field | Description |
|---|---|
| Specification Name | Something to identify the spec in a list e.g. "Xerox 2105" |
| Use Template | If you select an existing disbursement template the imported will use those values as defaults and save you having to include these in the import file. If you specify a template then the only mandatory fields in the file are Disbursement Date, Description, and Quantity |
| Date Format | Always use a 4-digit date and either "-" or "/" as delimiters. So for DMY you could specify 23-02-2015 or 23/02/2015 |
| List Position | If you have more than one Import Specification then this will govern the order they will display on lists when selecting them |
| Total Header Rows | How many rows before the data rows |
| Total Footer Rows | How many rows after the data rows |
| [[Action Alias]] ID* | Action ID (note that depending on your alias settings this may display as Matter ID or Project ID, etc). This will be the action the disbursement will be posted to |
| External Reference | Optional unique identifier for each row set by the source (e.g. the reference ID from the photocopier) |
| Disbursement Date | Date the disbursement was created (see Date Format above) |
| Associated User ID* | The Actionstep user doing the import or the user you want to associate with the import. This is the ID from their contact record in Actionstep |
| Description | Description of the disbursement item (e.g. "photocopies") |
| Quantity | This number multiplied by the unit price will give the total price for each line item |
| Unit* | Unit of measure (e.g. "Each") |
| Unit Price | Price for one unit of this line item |
| Includes GST | Specifies if the price includes sales tax (default is False) |
| GST Code* | Sales tax code |
| Income Account ID* | Which GL account this item should be coded to (for income purposes) |
Importing Files
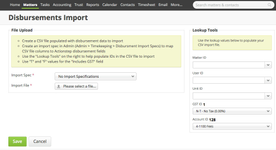
Goto Actions > Billing > Disbursements Import
Select a file, select an import specification, and enter any default values and then click "Save".
...
| Note |
|---|
If the importer encounters an error it will display a message guiding you to what caused the issue. If this happens no results will be committed to your system. You should address the issue and run the importer again in it entirety. |