Image ModifiedHome Image ModifiedHome
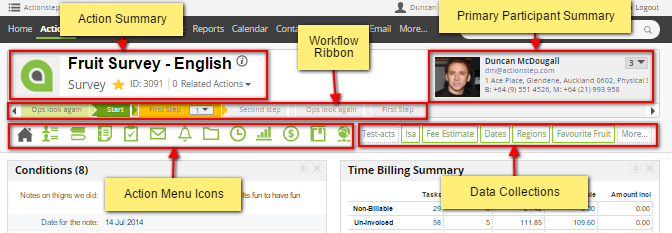
The Home menu option gives you access to the Overview screens. These are screens that are designed to give you information you need to now about the Action all in one place. Most Action Types will only have the one Overview screen available but some Action Types can be marked as of a certain type can give alternative Overview screens. For example, Marketing Campaigns or Marketing Activities have their own Overview screen. To learn more about the Overview screen available under the Home icon click here: Action Overview Panels .png?version=1&modificationDate=1455231386363&cacheVersion=1&api=v2&width=31) Image ModifiedParties Image ModifiedParties
Parties are the contacts (the people and companies) that are involved in this Action. They can be internal staff, customers, external consultants, any entity that you want to associate with this Action. There are two option under this menu and both display the same information but in different ways. The By Role option will show you the different Roles or Participant Types that this Action can have associated with it and then list the contacts who have been assigned to those roles. The By Party option will list the contacts associated with the Action and then tell you what Role they have been assigned to. To learn more about the screens under the Parties icon and what you see under each screen click here: Action Parties screens  Image ModifiedSteps Image ModifiedSteps
Each Action can be configured with different Steps. It is the way that the Action controls where you are up to in this particular piece of work. Clicking on this option to see the Workflow History for this Action. The Workflow History screen will show you all the previous, current and next steps and allows you to move to a previous or future step.  Image ModifiedFile Notes Image ModifiedFile Notes
File Notes are where you record and view basic information about your Action. They are a space for you to record and view events, changes or general notes under the User Notes. You can also review changes that have been Action by looking at the System Notes. The menu under File Notes will also allow you to create a new File Note to speed up your ability to enter new information. To learn more about File and System Notes that are found under the File Notes icon click here: File Notes  Image ModifiedTasks Image ModifiedTasks
Tasks are how you can record what needs to be done for an Action. Under this menu option you can see All Tasks that have been created for he Action. There are also menu option to see these broken down into the Tasks that are Not Started, In Progress or Complete. The menu will give you a count of how many Tasks there are in each category. If you do not see one of these option in the menu then there are no tasks that would fall under that status. There is also a menu option to create a new Task. To learn more about Tasks and how they work click here: Tasks, Time Records and Activities  Image ModifiedEmail Image ModifiedEmail
Any email can be assigned to a Acton so that you have a record of all communications you make in regards to the Action. Under the Email menu you can see these emails. Emails will be broken down into the various mailboxes: Inbox, Sent Items and Drafts. There is also the ability yo create a new Email from this menu which will automatically be associated with this Action. To learn more about Action Emails click here: Email  Image ModifiedAlerts Image ModifiedAlerts
Alerts are the reminders that you and your colleagues need to remember to get things done. They can be assigned to various parts of Actionstep like tasks or calendar appointments. Once an alert is triggered it can appear as a Pop-up on your Actionstep screen, as an email in the persons inbox or as a SMS or text sent to a mobile phone. This menu lets you view pending Alerts and create a new one. To learn more about Alerts click here: Alerts  Image ModifiedDocuments Image ModifiedDocuments
Documents is a place where you can keep and access all your files. Documents can be filed away into different folders in an Action. The Documents menu will display the available folders so you can navigate straight to the one that you want. There is also the option to go to the Folder View which will display all folders available in this matter. Lastly you can choose Add Document from this menu to upload a new document to Actionstep or to create a new document from a template. To learn more about how Document Management works click here: Document Management  Image ModifiedTimesheet Image ModifiedTimesheet
The timesheet option allows you to view all time entries for this Action. You also get the option to create a new time record for this Action.  Image ModifiedReports Image ModifiedReports
There are a number of Reports that Actionstep can give you (over 100) but you will find reports that are specific to this Action located under this menu. FOr more information on any particular report that you access under this menu see: Action Reports.  Image ModifiedAccounting Image ModifiedAccounting
Everything to do with Accounting for this Action will be found here. You will find information about the Billing for this Action, the Trust Account for this Action.There are a number of different menu options and not all Actionstep databases will come with all of them enabled. To learn more about the options available under the Accounting icon menu click here: Action Accounting Menu  Image ModifiedWiki Image ModifiedWiki
This is a space for information about how this Action Type works. Your Actions might be configured with a guide on how to use the Action Type or reference files to help you process this type of Action. The menu will depend on what has been loaded against this Action Type. To learn more about Wiki's click here: Wiki  Image ModifiedPortal Image ModifiedPortal
The Actionstep Portal is where clients can view or upload documents to a Matter. It is a secure place for you to share documents and communicate with your clients. Once configured contacts will be issued with a Portal login when they can access and see the documents you want to share with them. Under this menu icon you will be able to see an Overview of what is being shared for this matter and be able to view the Chat History (the typed conversations that have been had between your staff and your Portal users). To learn more about the Portal click here: Portal |