...
...
...
...
...
...
...
...
...
...
...
...
...
...
...
...
...
...
...
...
...
...
...
...
...
...
...
...
...
...
...
...
| Note |
|---|
Actionstep have upgraded their billing with our enhanced billing mode. If you system has not yet moved to Enhanced Billing mode then the information on this page will be useful. If you have however, please go to Single Bill to learn more. |
Table of Contents
Getting to the Matter Billing screen
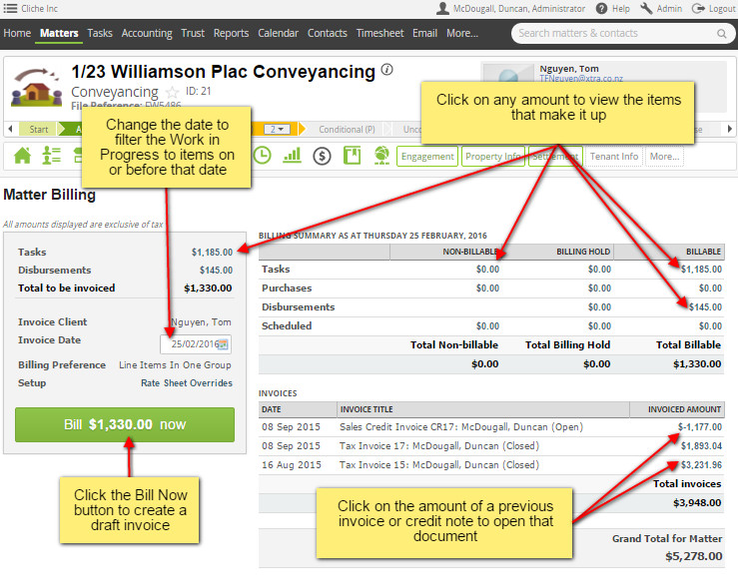
If you have opened up a specific matter you can bill this matter by going to Accounting > Matter Billing inside the action.
Click image to enlarge
The Matter Billing Screen
A screen will open up that will allow you to edit the data by clicking on the numbers in the same way as the multi-action billing list (eg, click on the monetary amount in blue next to Tasks to be able to see all the time entries that make up that total).
Tasks - will show the time records that you saved in the system
Purchases - Also sometimes called hard disbursements. These are ciosts entered in as supplier invoices that you are wanting to pass onto the client
Disbursements - Also called Soft Disbursements. These are the disbursements that you have entered in as costs that you incurred in the process of working on this matter such as land searches, courier fees, etc.
Scheduled - These are payments which you have scheduled to charge to the client. They are also a good way to handle your fixed fee billing. See Fixed Fee Billing for more details.
When you first access the Matter Billing page the "Invoice Date" defaults to the current day. Any items that are billable after this date will not show on this screen. If you adjust the Invoice Date then ActionStep will retain that date as the default for the rest of your session.
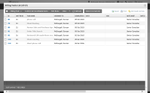
Reviewing the Items that make up the totals showing
As above, you can review the items that make up any of the totals showing on the Matter Billing screen by clicking on the monetary amount. This will open a list view of the items.
Click image to enlarge
Use the tool bar above the list and the tick boxes to the left of each listed item to make changes to the items. You can place items on Billing Hold, Delete items, Change their rate sheet or use the Edit Mode to change other attirbutes of the items that are displayed.
You can also use the Confirm Non Billable option to change a time record from billable to non billable.
Once you are satisfied with the items you can exit the listed items by clicking the cross in the top right hand corner or selecting Return to Main List on the task bar and return to the Matter Billing screen. Simply click the "Bill Now" button to create the invoice. The invoice will open up in draft mode and allow you to make any final changes.