...
| Table of Contents | ||
|---|---|---|
|
Introduction
Workflow is what sets Actionstep apart from many other systems and allows organizations to customize Actionstep to their specific needs. Workflow provides a vehicle for organizations to translate their intellectual property into a usable system. In ActionStep each workflow is configured as an Action Type, which allows users to create new Actions of that type and be guided by the resultant workflow. Workflows are created by defining a number of Steps. Steps can then be connected together to create a Step Tree.
| Tip | ||
|---|---|---|
| ||
Admin > Workflow > Action Types |
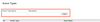
To create a new Action Type Enter the new Action Types Name and Description and press the Add button.
| Warning |
|---|
Please note that you cannot edit/create multiple action types at the same time. You will lose work if you attempt to do this. |
Quick-Start Video
Widget Connector url http://vimeo.com/78492097
Step Tree
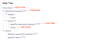
Every Step Tree has a Root Node, the initial step, followed by one or more branches, giving users a choice of paths to follow. Steps can be re-used at several places in the step tree, and for that reason we use a generic term for each position in the step tree, and call them Nodes. The nodes at the very ends of the branches in the step tree are called Leaf Nodes.
Consider the following step tree for an action type:
...

Requirements Gathering
Before you begin configuring a workflow you need to know what it needs to do. So where do you get this information from?
Regulatory or Industry Bodies
If the type of work the organization performs is governed by legislation, is subject to audit, or is in an industry with best-practice guidelines then this is the place to start. You might be surprised by how many organizations run under operating procedures that are not consistent with the compliance requirements for that sector. This can be a result of procedures that have not been updated regularly, are incomplete, or just plain wrong.
When you create a new workflow this is a good opportunity for the organization to check on the current compliance requirements and bring their operations into line. The compliance requirements will provide a solid foundation for your workflow design.
| Tip |
|---|
| Use Web-Links in the Knowledge Base to include references to any related legislative, or industry information resources in the Internet. You can later link these to specific steps in the workflow using Smart Help. |
End Users & Experts
Consult end users, managers, company owners and any subject-matter experts to get their input into the process. Besides providing a valuable source of information this also gets early buy-in from these people and they will feel some ownership of the new system and be much more likely to embrace it when it rolls out.
Existing Documents, Forms and Templates
Take a look at existing files for work of this type and print out samples of the correspondence and forms that were used. Use a highlight marker to identify any data elements that are specific to that type of work (dates, amounts, standard choices, etc), and also the people and organizations referenced in these documents. From this you will be able to compile a preliminary list of Custom Data and Participant types.
Written Policies & Procedures
If the organization has any internal documentation on how work should be performed then this can be a very useful source of requirements. Just bear in mind that in some cases this information may be out of date, so be sure to review this with management before adopting it as-is.
Creating the Workflow
Now that you have the requirements it's time to create the workflow in Actionstep. What follows are general guidelines on how to approach this, but there is no single 'correct way' to do it. A lot will depend on personal preference, experience, and the specifics of the requirements.
| Tip | ||
|---|---|---|
| ||
You have a lot of tools at your disposal when it comes to configuring workflows and it is often tempting to pack in a lot of detail into each workflow. We have found that it is much better to start off with a simple workflow and add in complexity later as needed. This is important for two reasons; (a) it is easier to add complexity than to remove it, and (b) if the users come up with suggestions you will get more buy-in from them when these changes are rolled out. Introducing a new system into any business is disruptive no matter how good the new system is. Users are busy people and they naturally resist change. If you introduce a complex new workflow they will find it difficult to understand, and if it is over-prescriptive they will feel like the system is telling them how to do their job. It is better to start with a simpler workflow where users can clearly see the benefit and once they start using it they will then be in a position to provide positive feedback. Also by slowly introducing any additional features users will have time to absorb each change. |
1: Open up Workflow Admin
In the main menu bar select Workflow Admin. If you don't see this option then you probably do not have the necessary permission, so ask your administrator or Actionstep support representative to enable this for you.
2: Setup the Participant Types
Before you create the Action Type make sure that all the required participant types have been created. Go to the Participants area of Workflow Admin and inspect the list of current participant types and compare that to the ones you require for the new workflow. Create new participant types as required (you can always come back and add more later, so don't worry if you forget some):
...
- The participant type name will automatically be turned into a merge-field prefix for any related custom data and thus it cannot have spaces. The system will automatically substitute spaces with underscore characters when you save the participant type definition.
- The tax number alias will change the label on the contact edit form. For companies you could put GST or FEIN and for individuals you might want to choose SSN for this field.
- The relationship type will nearly always be Secondary (the default choice). Only choose 'Primary' if you are creating a new entity type that is neither Individual or Company. If in doubt leave this as 'Secondary'.
- The Company Flag Value sets the default layout when creating new contacts of this type which makes the system more intuitive for the user. If you specify 'Individual' then the contact form will display fields for First and Last Name, and if you specify 'Company' then the form will display the Company Name field. If you choose 'Not Specified' then the user will be able to choose this at the time of creating the contact. Some participant types will always be individuals (e.g. Doctor), some will always be companies (e.g. Court) and some could be either (e.g. Client).
3: Create the Action Type
Go to the Action Type List (Admin>Workflow>Action Types).Fill the "Action Type Name" and "Description" fields and select "Add." This will add your new Action Type to the Action Type list below. When you're ready to start customizing your workflow simply select the Action Type name. 
select image to enlarge
| Widget Connector | ||
|---|---|---|
|
...
select image to enlarge
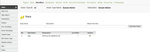
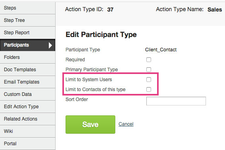
4: Add the Participant Types
| Widget Connector | ||
|---|---|---|
|
Add the required participant types to this action type from the master list of participant types created earlier. They will be needed when you create default tasks, automatic email, etc.
| Tip |
|---|
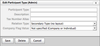
To assist with user input you can optionally limit the participant type search to system users (people with a login) or to contacts of a certain type (e.g. Client, Lawyer, etc). You do this by editing the participant type once you've added it to the action type (see screenshot below) |
5: Add the Steps
| Widget Connector | ||
|---|---|---|
|
Add a step name and description for each of the steps in the workflow. Later on you will link the steps together into a logic tree.
| Warning | ||
|---|---|---|
| ||
There is a big difference between Steps and Tasks and it is very important that you understand the difference in order to build effective workflows. Make a note of the following definitions:
A good way to figure out the name for a step would be to answer the following question: Where are we with this matter/job/case/project (action)? Answers might be "Gathering Information", "Preparing for Settlement", "Wrapping Up", etc. These are all good step names. If a step name sounds like a task then it might be time to think it through a bit more. Another issue with having step names sound like tasks is that there are generally far more tasks than steps in a workflow and so you will end up with lots of steps and a complicated workflow. |
Adding the Steps
Try to add the steps roughly in the order they will be used in the workflow; this way the default 'list order' will be accurate (but you can always edit this later if required).
| Info |
|---|
The 'List Order' attribute of a step is simply how the steps are sorted when displayed in a list, and it does not affect the sequence of steps within the workflow. |
| Tip |
|---|
| Leave gaps in the list order so you can insert steps into the sequence later on. For example order them as 10,20,30,40,… rather than 1,2,3,4,…. This way you can insert a step between steps 10 and 20 by giving it a list order of 15. |
6: Create the Step Tree
Now that you have listed all the steps it's time to link them together in a Step Tree. The step tree is the logical flow between steps. Each action type is automatically created with a "Start" step which is the root of the step tree. You can either leave this as-is or rename it by editing the step in the list of steps and clicking on 'Misc.'.
When a step is inserted into the step tree we call it a Node. To add a node click on an existing node (the Start node if this is the first one) and then choose 'Add Node' from the popup menu. You can then add a node to your newly-created node by clicking on it. Just repeat as required to build your step tree.
| Tip |
|---|
You can collapse or expand parts of the step tree by clicking on the '+' or '-' links. |
Creating Decision Points (forks in step tree)
Most workflows will not be simple linear sequence of steps. Usually there are points where users need to decide whether to go down one path or another. To create a decision point simply create two or more child nodes from the same parent node.
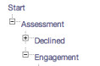
In the above example 'Declined' and 'Engagement' are the two decision options following the parent node 'Assessment'.
Alternate Steps
Alternate Steps are also a type of decision point however they do not take the user down a different path in the step tree (it is very important that you understand this distinction). Alternate steps are choices between steps on the same destination node. Alternate steps are not used very often but can come in handy in certain circumstances. This is best illustrated this by a few examples.
Example A: You have a mix of experienced and trainee staff who are working on the same workflows. When moving to a new step the experienced staff do not want to be micro-managed and have tasks assigned to them for every little detail of what needs to be done. On the other hand the trainee staff need the details to ensure that they do not miss anything. The solution is to create two steps at the same node; the one for experienced staff will only contain the minimum number of mandatory tasks to maintain compliance whereas the trainee step will have many more tasks with lengthier descriptions. The same job will be accomplished either way but the user can choose between alternate steps.
Example B: You have a node which handles the processing of a support request and assigns the action to someone to follow-up. Some requests are urgent and others are routine. Either way they follow the same process but the timings on the urgent request are different than the routine request. The solution is to create two alternate steps for this node. The 'urgent' choice will have default tasks set to high priority and shorter response times than the routine choice.
| Tip | ||
|---|---|---|
| ||
The beauty of ActionStep is that it is so easy to change and thus it makes an excellent prototyping tool. Use this to your advantage. Once you have put together the initial list of steps and connected them in a step-tree, get the users together and create a test action and run through the prototype workflow. You will often get valuable feedback on requirements you may have missed initially. Users find it easier to provide feedback on something they can see, rather than a concept. Incidentally, this is one of the main failures of traditional custom-designed software; requirements have to be gathered in advance and then set in stone as the software is written. When the users finally get to use the software only then do they have a clear picture of how it is intended to work and are able to provide a lot more detailed feedback. Unfortunately by then it is often too late. Not so with Actionstep, so use this to your advantage! |
Jump Steps
In many cases you need to manage a scenario where you need to "jump" from one node to another and bypass the parent-child node navigation paths. Examples where jump steps might be useful include:
- Creating loops;
- Jumping back to prior steps;
- Iterative processes such as document drafting and review; and
- Placing actions "on hold" pending some future decision.
Loops
Occasionally workflow needs to go around in circles. For example an accounting firm might do monthly sales tax returns for clients. Then workflow might be something like:
- Start
- Client Engagement
- Information Gathering
- Prepare Tax Return
- Submit Tax Return
- Ready for Next Return
- Client Disengagement
- Closed
After preparing the first tax return the action will be sitting on step 6 (Ready for Next Return). The following month the action would need to move back to step 3 (Information Gathering) and then go through to step 6 again.
You could accomplish this using related actions (see below) and break steps 3 through 6 into a separate action; however, if you wanted to keep it all in the same action type, then the only way to do this is to add a Jump Step to the end of Step 6 pointing back to Step 3. This will give the user the choice of starting a new tax return or disengaging with the client.
Assigning Weights to Nodes

A strep tree typically represents several possible paths through the steps. The step ribbon inside each action shows
- the previous steps (light green),
- the current step (dark green)
- the next possible steps (yellow), with the default next step shown, and
- future steps following the default next step.
In order to figure out the default next step Actionstep looks at any downstream "weights" that have been assigned to the nodes in the step tree and choses the next step that will lead to the "heaviest" downstream node. This allows you, as the administrator, to set the most desirable paths through the step tree by assigning weights to the nodes, and by doing so the system will show the user the most desirable next step at each stage in the workflow.
For example if you were creating a litigation workflow you might assign more weight to the mediation path rather than the court trial path.
7: Document Folders
Setup a folder structure to organize the documents in these actions. Each time a new action is created of this type the system will setup the specified folder structure. The user can still modify this in each individual action but this at least sets up a base set of folders.
| Info |
|---|
Changes made to the folder structure will only affect actions created from that point forward and will not affect existing actions. |
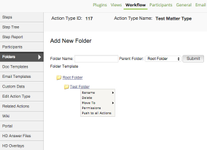
Adding a Folder...
To add a folder simply type the name of your folder in the 'Add' field.

Clicking 'Submit' will create a folder with the specified name.
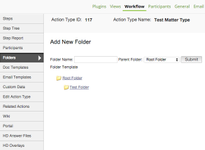
Click on the folder name to configure folder-specific settings such as permissions.
8: Document Templates
Upload any document templates that will be required in this action type. Later on you will be able to associate these with specific steps.
9: Custom Data
Custom data is organized into data collections and data fields. Data collections are groups of related data fields and appear on individual menu items under the Action Data tab in each action. Data collections can be 'multi-row' or 'single-row'. Multi-row data collections can have several records of the same type within the same action. When you open up a multi-row data collection it displays as a list and you can add new records to the list. A single-row data collection only allows one record of that type per action and when you open this data collection within an action it displays as a form. Each time you define a new custom data field Actionstep creates a corresponding merge field for use with document and email templates. The 'data source' group for the merge field is the same as the data collection name. For more information on the different types of custom data fields you can use see our user guide on Custom Data Field Types.
10: Related Actions
In many cases the workflow cannot be expressed as a logic tree progressing from the root node to one of the leaf nodes. Sometimes things can spring up randomly. For example: you may receive information requests from opposing counsel at any point in the proceedings and you will need to follow a sequence of steps to ensure that these are responded to correctly. Without related actions you would need to include this as an option at every step in the workflow which would make for a very complicated step tree.
The solution is to create a separate action type for the information request in this example. In the action type editor you can specify this as an available related action and the user can then create a related action associated with the main action whenever required. The related action runs in parallel to the main action.
If you know that related actions are more likely to occur at a specific step in the main action then you can be even more specific and link the related action to that step as optional or mandatory. You can setup a default naming convention for the newly created related action using merge-field syntax.
For example: if you want the related action to be named "Info Req: XXX" where XXX is the name of the parent action you would specify this as
"Info Req: [[Action_Name]]"
Once you save the related action link you can make things easier for the user by defining which parties in the parent action should be copied to the related action, and the mapping between the roles. You can also specify if any custom data should be copied across to the related action.
11: Configure the Steps
Now that the step tree has been configured and you have shown this to the users and received their approval it is time to put the detail into each of the steps. Go back to the list of steps and click on each step in turn to open up the step editor for that step.
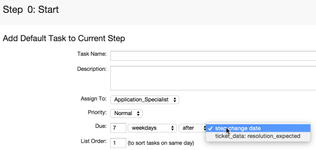
Default Tasks
Default tasks serve two main purposes; (a) they set out all the work that needs to be done by the various parties at each step, and (b) they enforce compliance by specifying if a task is mandatory or not.
A mandatory task will either prevent the user from moving off the current step until the task has been completed, or moving to some step in the future. Preventing the user from moving off the current step is self-explanatory; however preventing them from moving to some step in the future is best illustrated by example:
- Let's say that you have created a step tree for a litigation process, and at one of the early steps you assign a default task to the paralegal party to compile a witness list.
- This task is not required to be completed on the current step but has been marked as mandatory before moving to a step further down the tree called 'Jury Trial'. Now depending on how the action unfolds the case may get settled before trial and thus the Jury Trial step is never reached. In that case this task never becomes mandatory.
- If, however, there is a trial, the user will be prevented from moving to the Jury Trial step until the paralegal has completed the witness list task.
If a task involves generating a document template, you can link the document template to the task. The user will see an icon on the task which will allow them to generate the document by clicking the icon.
If the task requires the user to enter some custom data then you can link the task to the custom data collection. The user will see an icon on the task that will allow them to enter the data by clicking the icon. Note that it might be preferable to link the required data directly to the step instead, which will prompt the user for this information when moving to the step (see below).
Once you have saved the default task you can setup default alerts for the task by clicking on the alerts icon in the default task list.
| Tip | ||
|---|---|---|
| ||
If your task is dependent on another date then you can set the task due date a certain number of days before or after the date (provided you have defined the date as a custom field). See screenshot below |
Document Templates
You first need to add any required document templates to the Action Type via the action type editor and then you can associate any of those document templates to each step as required. When a user moves to a step with an attached document template Actionstep will add the template to the documents page of the action in the specified folder.
Automatic Email
You can configure email messages to be automatically sent from one party to another when reaching a step. The subject and body of the email can use the merge-fields used for document generation.
Smart Help
In the Knowledge Base you can link pages from the Knowledge Base to steps in the workflow. Once linked, you can edit the sort-order of these pages in the step editor to control the sequence the user will see when they click on Smart Help. If you click on the Smart Help tab in the step editor and find nothing, then go to the Knowledge Base and link the pages through to the step.
Miscellaneous Settings (Misc.)
Here you can set various other attributes of the step including who it should get assigned to, limit the range of sale probabilities, specify which sale-purchase items can be created, etc. This is also the place where you can change the step name if required.
Parties and Data Fields
You can specify which parties and custom data fields need to be entered on this step. This would be helpful if you know that a certain document template requires this information in order to merge correctly. When the user moves to this step he/she will be prompted to enter the specified parties and data.
Related Actions
If certain related actions should be launched upon reaching this step then indicate them here by choosing from the list of related actions associated with this action type.
12: Email Templates
The email templates created as part of the action type are different than the automatic email created inside each step. The email templates are available to the user at any point throughout the workflow of the action and are accessed via the email Compose page. Automatic email on the other hand is sent without user intervention when moving to each step.
Be careful of cutting and pasting merge fields and externally formatted text into the visual editor. If you want to paste text then switch to HTML edit mode by clicking the 'HTML' button.
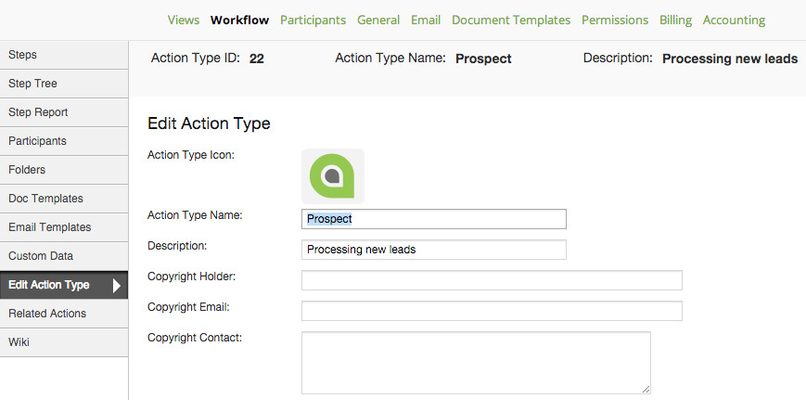
13: Copyright, Logo, and General Settings
Copyright
Click on Edit Action Type to enter the copyright information. The intellectual property related to any workflow configuration belongs to the person/organization that created it. Once you hit Save this copyright information is burned into the workflow. You are free to make this available to other Actionstep users on any commercial terms you see fit or sell it on the Actionstep Online Store. Please contact Actionstep if you would like to make your Workflow available on our App store to learn more.
Logo
It is a very good idea to upload a custom logo for your action type. This improves the user experience and gives you an opportunity to "brand" your intellectual property.
Time Recording
Click on track actual and/or billable time for this action type.
Disable/deleting Action Types
If an action type is no longer in use then mark it as "Disabled". You can't delete it since there may already be actions of this type created on the system; but by marking it as Disabled users will no longer see this action type as a choice when creating new actions.
14: Permissions
Okay, now your action type is all setup. The last thing you need to do is set the permissions. There are three areas where you can control the permissions.
(a) System Role Permissions
Go to Workflow Admin > Settings > System Roles. Here you will be able to set the access rights for each system role against each system object. Once you have created your new action type ActionStep will create system objects for both the action type and the custom data collections.
| Info |
|---|
You need to set permissions for the Action Type and all associated Data Collections separately. |
(b) Folder Permissions
In the action type editor you can click on each of the default folders individually to set read/write and delete permissions by system role.
(c) Menu Permissions
...
| Info |
|---|
See updated article in Actionstep Help Center: https://support.actionstep.com/hc/en-us/articles/360008510594-Workflow-Creation |