Document templates are created using standard Word documents and inserting Actionstep merge fields in the positions where you require live data to be inserted. Document templates are used to generate documents within Actions and for accounting documents (quotes, orders, invoices).
Learn more about Actionstep Merge Fields
| Table of Contents |
|---|
Different Types of Document Templates
Widget Connector url https://vimeo.com/223064566
Template Formats
Document templates can be in RTF or DOCX format (note that DOC and PDF are not supported as input formats, but PDF is supported as an output format).
HTML, TXT, and XLSX formats can also be used but there may be limitations. Feel free to experiment!
The DOC format is a proprietary Microsoft format and is not suitable for document merging. DOCX however is an XML (open text) format and is the preferred format for creating Actionstep document templates. RTF was used prior to the advent of DOCX, and although it is still supported in Actionstep, it is not recommended due to inconsistencies in formatting and large file sizes when documents contain images.
| Tip |
|---|
Use DOCX if you have a choice. |
Output Formats
Generated documents are output in the same format as the templates that were used (DOCX, RTF, etc) to create them. Options exist inside Actionstep to convert the generated documents to PDF.
Creating Document Templates
To create a document template do the following:
- Open MS Word
- Create a new document, or open an existing document
- Format the document using sample data until it looks exactly the way you want it
- Locate the parts of the document that vary depending on the Action or Sale/Purchase (e.g. names and addresses, amounts, descriptions, dates, etc)
- Replace the variable content with the corresponding merge fields by either creating a MS Word merge field with the ActionStep merge field name, or by placing the ActionStep merge field name between double square brackets e.g. [[Action_Name]]
- Upload the template to ActionStep
Uploading Action Templates
| Widget Connector | ||
|---|---|---|
|
In Workflow Admin, open up the Action Type where the template should reside. Go to the Doc Templates tab and click Add Document Template:
Type in a name and description for the template, select the template file from your local computer that you have just created, and press Submit.
The template is now available for generation in any action of that Type.
| Tip |
|---|
You can use merge fields in the document name, which will get merged when the document is saved or generated. |
Linking Templates to Steps
Once the template has been uploaded to the Action Type you can link it to any Step using the step editor.
Linking Templates to Tasks
When creating a default task in a step you can select the option to link a document template to the task:
...
In many cases you may need to generate a document for a selected participant. For example if you have an action with several witnesses and you need to generate a letter to each witness.
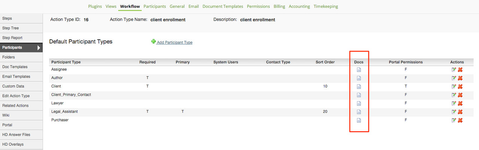
To set this up edit the action type and click on Participants. Click on the "Docs" icon next to the participant type and link it to one of the available document templates.

To Generate the document go to the Parties list inside the action and click on the specific participant. A list of linked document will be available for generating.
Generating the Action Template (from a Matter)
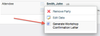
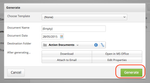
The template can be generated inside an action from either the Document screen, or by clicking on the Generate icon on any linked Task:
Once you have chosen the template you can generate the template by clicking 'Generate' at the bottom of the screen.
If the template is linked to a default task AND the task is mandatory for the current step, a quick link will appear to generate the document from the Step screen:

Generating the Action Template (from a Contact)
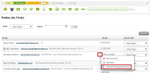
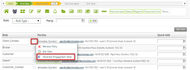
You can also load templates against different roles in Actionstep. To generate a templates loaded against a Role open the matter and go to the Roles by Parties or Roles by Contact option.
Click on the menu icon beside the contacts name or Role (depending on which screen you are on, see screenshot examples below) and choose the template you would like to run.
From the Parties by Party Screen From the Parties by Role Screen
(Click to enlarge image) (Click to enlarge image)
Adding Documents to Participant Types
To add a document template to show up to be generated from a Participant Type on the Parties screen...
| Tip | ||
|---|---|---|
| ||
Admin > Workflow > Action Types > Select the Action Type > Participants > Click the 'Docs' icon next to the Participant Type you want to add the document template for > Add the template and it will now show up for contacts of that Participant Type. |
Uploading Billing and Accounting Templates
| Widget Connector | ||
|---|---|---|
|
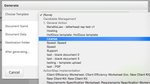
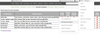
To upload a template to use for a quote, order, or invoice go to the Document Templates tab in Admin, select Bill/Expense Templates:
Then click on Add new template at the bottom of the page:
Give the template a name, link it to the required sale/purchase types, and select the template file that you have been working on, and save:

The template will then be available inside accounting when you create sales or purchases of that type.
Tips and Tricks
Preventing long blocks of text from messing up check (cheque) templates
Check templates need to be accurately aligned to the pre-printed check stationery. Sometimes very long text strings, like memo fields, can wrap and push the following text down a few lines which will mess up the alignment. To prevent this use MS Word "text blocks" to contain the variable-length text fields. This will constrain the text to a defined area within the template and truncate it if necessary. Use MS Word Text Block to constrain variable text fields in check (cheque) templates.
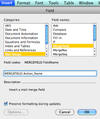
Use MS Word Merge Fields instead of square brackets
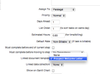
If you insert genuine MS Word merge fields instead of using the [[square bracket]] syntax then you can override the display name in the document to make for easier to read templates. Note that the "Insert merge field" function varies from place to place depending on your version of MS Word.
This is what it looks like on a Mac using Office 2008:
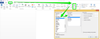
This is what it looks like on Windows using Office 2013:
Use Safe Fonts
The availability of fonts varies with each machine, so if you create a document with a font that is not available on the end-user's computer then Word will substitute the font which may affect the layout. This is especially important for templates such as checks (or cheques) and tables in invoices.
| Tip |
|---|
Always use "safe" fonts from the list below. These fonts are available in most versions of Office and on Macs and PCs:
|
...
| Tip |
|---|
If you have Admin access then you can also use the Document Merge Testing Tool |
This is a neat "insider" trick. Open the action where you wish to test the merge field and then modify the URL by substituting doc-merge-test for the page name. For example, change
| Code Block |
|---|
/mym/asfw/workflow/action/overview/action_id/1234 |
to
| Code Block |
|---|
/mym/asfw/workflow/action/doc-merge-test/action_id/1234 |
and then refresh the page. You should see something like:
...
Use the same trick above, but with a slightly different URL, to test invoice templates:
| Code Block |
|---|
| Info |
See updated article in Actionstep Help Center: https://support.actionstep.com/hc/en-us/articles/360052208654-Actionstep-Templates |