Now that you've created some steps you can start to build in some automation.
Each time a user moves an action to a step you can specify what should happen at that step.
We're going to start with default tasks because they are tremendously useful.

Tasks - what are they?
In Actionstep a "Task" is something that needs to be done by a specific person by a certain date (the "due date"). Tasks are typically clearly defined individual items of work rather than general responsibilities. Examples of tasks include "Upload client identity documents", "Confirm that complaint has been filed with the court", "Send initial letter to prospect", etc.
Default Tasks
Default tasks can be included in each step of the workflow. Default tasks are assigned to "roles" (participant types), because you don't know ahead of time who will be involved in the actual actions).
When users move to a step in a live Action the task will be automatically assigned to the person playing the specified role in that particular action.
Default Tasks act as Quality Control Gates
You can specify if a task is optional or mandatory and whether or not the task must be completed before moving off the step, or moving to some step in the future. This way you can be sure that everything that must be done on a step is always done.
Setting Due Dates
Due dates for default tasks need to be set relative to real dates in the actions. Because you don't know this ahead of time you need to set the due dates a certain number of days before or after either the date that the step was reached in the actual action or relative to a custom date defined for that action type. We'll get to custom data later, so for this tutorial you will be setting the due dates relative to the step change date.
There is also a video explaining how to add these tasks at the bottom of this page
Enough Theory - Let's get into it!
Okay, back into Admin (you're probably starting to get used to this now, so no pictures this time). From the top panel: Admin > Workflow > Action Types. Then click on your action type to open the editor.
In the "Steps" list click on the step that you want to automate. This will open the editor for that Step and will default to the Default Tasks for that step (exactly where you want to be).

Click "Add Task" and fill in the details.

Here are the fields that you need to fill in. Don't worry about the other ones for now.
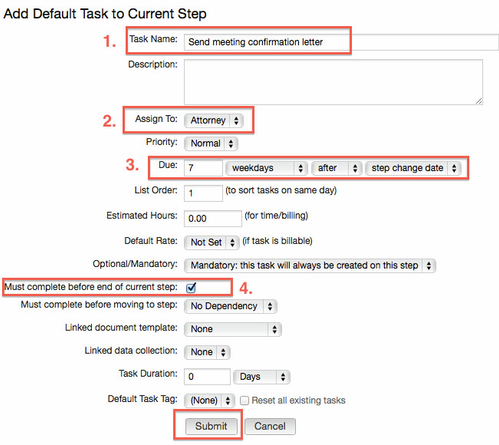
1. Task Name
This will be the name of the task when assigned to the user, so make it clear what needs to be done.
2. Assign To
The person who the task will be assigned to.
3. Due
The relative date offset for the due date. Since you don't have any custom dates defined yet simply use the step change date which is the default. In this example the task will be due 7 days after the user moves to the step. Modify as you see fit.
4. Must complete before end of current step
It's always a good idea to check this box because it ensures that the task is completed before allowing the user to move to the next step.
Then click Submit and close the tab to dismiss the step editor.
5. Linked document template
This allows you to link a document that would be specific to the task the person is creating to the task. When viewing the task on a step change screen beside the task will be a cog symbol  . Clicking on it will allow the user to create that document. This is handy for when the task is something like "Send letter of engagement". The user can easily create the letter from the link.
You can also make sure that this option shows in your custom task lists.
6. Linked Data collection
Similar to the linked document, enabling this will allow for a edit symbol  to appear beside the name of a task when it is viewed on a step change screen or the Workflow History screen. Clicking on this will open the nominated data collection. This can be handy when the task is for the user to update a specific data collection, eg, update property details.
You can also make sure that this option shows in your custom task lists.
Let's see it in action (literally)!
Open your action (if you've created more than one action type make sure it's the same action type where you added the default task).
Move the workflow through to the step that you added the task to (by clicking on the steps in the workflow ribbon). In this example it was on the "Initial Meeting" step.

On the step change screen you see your default task.
Getting a warning/error message?
Tasks can only be assigned to people with a login to the system (otherwise they would have no way of seeing them). So make sure you have added a valid user to the role the task will be assigned to (you're probably the only user at this stage so add yourself to the role to be sure).

Hit "Submit" and the action will move to the next step and you will be assigned the task. If you made this task mandatory for this step then you won't be able to move to the next step without confirming that this task has been completed (which gets recorded in the audit trail). Try it.
Set an Alert
Now that you have your task automated you can set an alert to notify you when the task is created or the status is changed.
Video on adding Default Tasks