Now that you've created some steps you can start to build in some automation.
Each time a user moves an action to a step you can specify what should happen at that step.
We're going to start with default tasks because they are tremendously useful.
Tasks - what are they?
In Actionstep a "Task" is something that needs to be done by a specific person by a certain date (the "due date"). Tasks are typically clearly defined individual items of work rather than general responsibilities. Examples of tasks include "Upload client identity documents", "Confirm that complaint has been filed with the court", "Send initial letter to prospect", etc.
Default Tasks
Default tasks can be included in each step of the workflow. Default tasks are assigned to "roles" (participant types), because you don't know ahead of time who will be involved in the actual actions)
When users move to a step in a live Action the task will be automatically assigned to the person playing the specified role in that particular action.
Default Tasks act as Quality Control Gates
You can specify if a task is optional or mandatory and whether or not the task must be completed before moving off the step, or moving to some step in the future. This way you can be sure that everything that must be done on a step is always done.
Setting Due Dates
Due dates for default tasks need to be set relative to real dates in the actions. Because you don't know this ahead of time you need to set the due dates a certain number of days before or after either the date that the step was reached in the actual action or relative to a custom date defined for that action type. We'll get to custom data late, so for this tutorial you will be setting the due dates relative to the step change date.
Enough Theory - Let's get into it!
Okay, back into Admin (you're probably starting to get used to this now, so no pictures this time). From the top panel: Admin > Workflow > Action Types. Then click on your action type to open the editor.
In the "Steps" list click on the step that you want to automate. This will open the editor for that Step and will default to the Default Tasks for that step (exactly where you want to be).
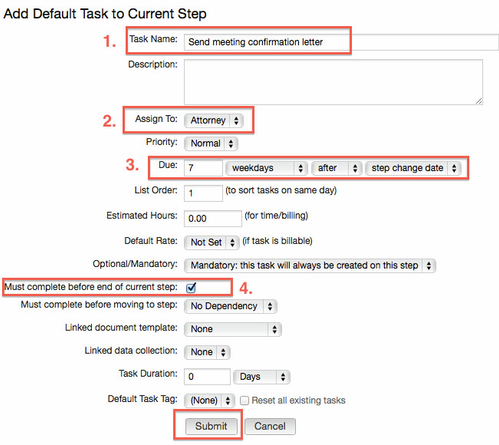
Click "Add Task" and fill in the details.
Here are the fields that you need to fill in. Don't worry about the other ones for now.
1. Task Name
This will be the name of the task when assigned to the user, so make it clear what needs to be done.
2. Assign To
The person who the task will be assigned to.
3. Due
The relative date offset for the due date. Since you don't have any custom dates defined yet simply use the step change date which is the default. In this example the task will be due 7 days after the user moves to the step. Modify as you see fit.
4. Must complete before end of current step
It's always a good idea to check this box because it ensures that the task is completed before allowing the user to move to the next step.
The click Submit and close the tab to dismiss the step editor.
Let's see it in action!
Literally. Open your action


