Configuring Actionstep to send and receive email
Actionstep Mailbox
The Actionstep mailbox is a mailbox that Actionstep uses to send and receive email. We recommend creating a new mailbox in your existing email system* - treat this like adding a new employee to your team - with an email address that makes sense to you (actions@yourcompany.com, matters@yourcompany.com etc.). The new mailbox can be provided by any email provider that supports POP3 (Gmail, Hotmail, Outlook365/Exchange, your ISP etc.). Actionstep collects all mail from this mailbox to deliver to the relevant email users / actions / matters etc. within the Actionstep system. This mailbox can be either a single address (example.address@email.com) or a catchall address (*@email.com) but there is no preference to which type you use**. Actionstep does not provide Mailbox hosting but we can recommend providers if you need help.
*Please note: It is not a good idea to use an existing mailbox as Actionstep removes all email from the mailbox as part of the process. This can cause confusion and problems that can be easily managed/avoided by creating a new mailbox for Actionstep.
**If you are unsure of your mailbox type assume it is a single address mailbox.
*** For directions on how to configure a gmail / Google Apps catch-all mailbox click here.
How to find the settings you need
To connect Actionstep to the new mailbox you will need to find the POP settings for the mailbox. These are usually found in the Settings page of your email provider.
For example - the gmail.com settings can be found by clicking on the settings icon and selecting Settings - Forwarding and POP/IMAP then clicking Configuration Instructions at the bottom of the screen. On the next screen select POP then Other and you will see the page below. These are the settings we need to enter into the Actionstep Email Preferences page.


< further examples will be added here shortly - if you have any questions about your setup please contact support@actionstep.com at any time >
Configuring Actionstep to use the new mailbox
In the Administration > Email > Email Preferences menu (below) you will see the following screen. This is the screen where we set all the global Actionstep email settings.

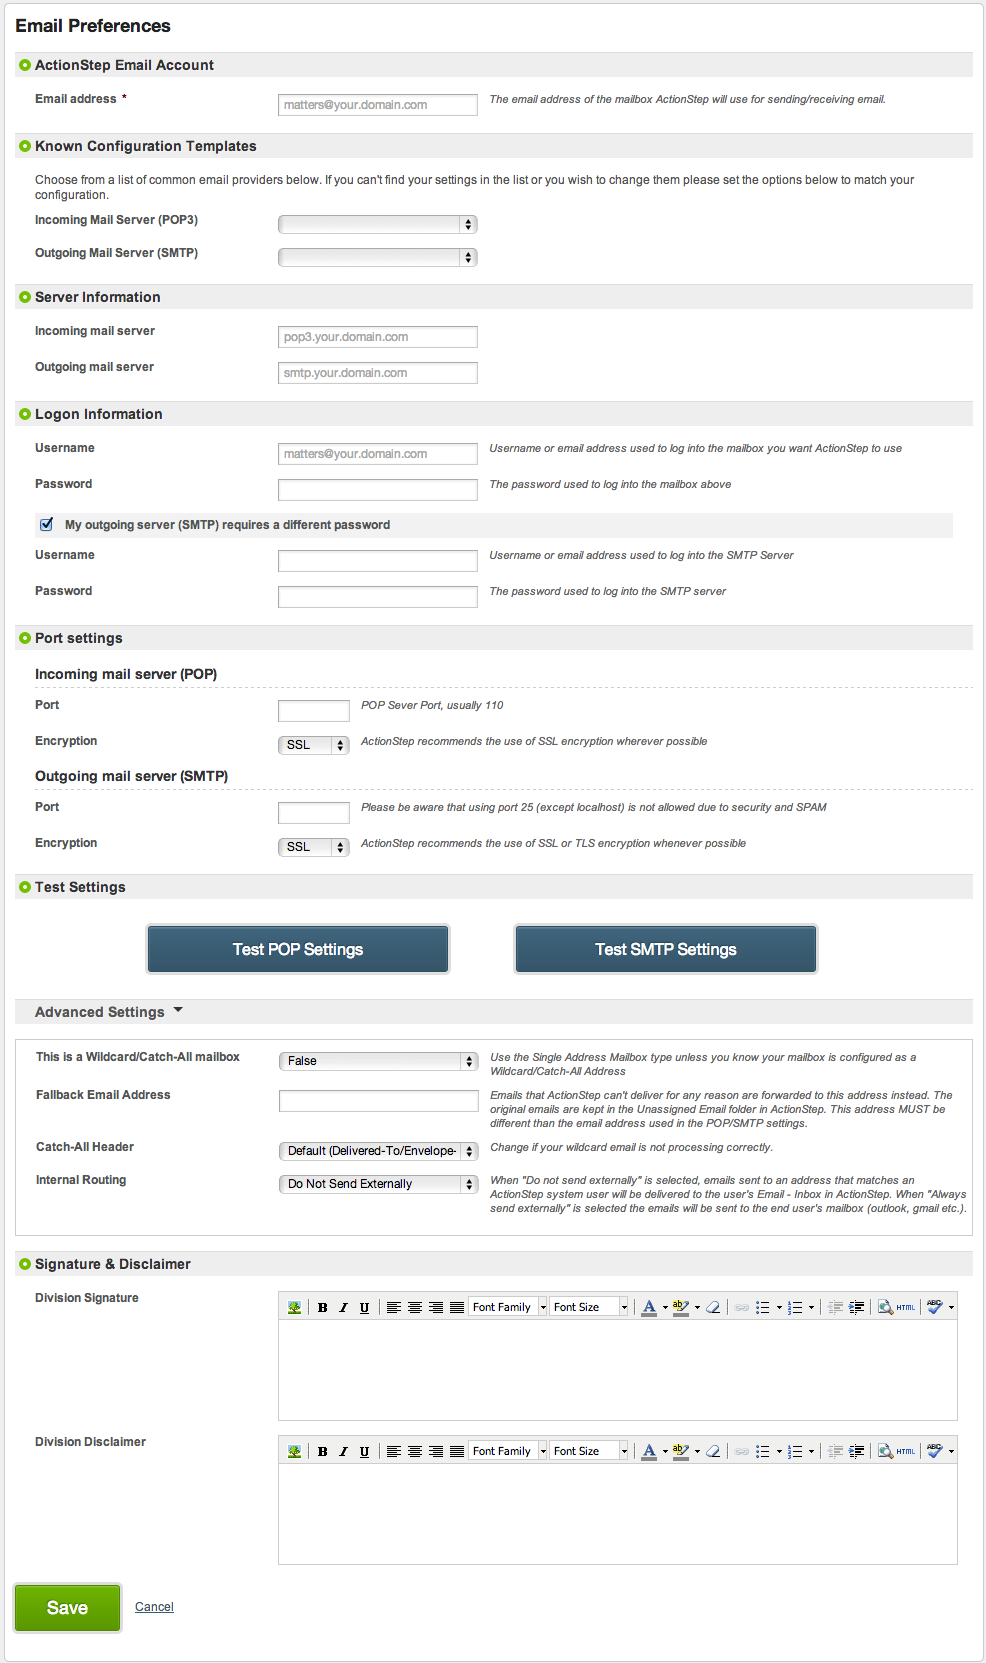
Working line by line through the Email Preferences screen is the best way to approach this. For this example compare the options below to the gmail settings above - you will need to find the relevant information for your email system before continuing.
- Email Address: This is the email address of the mailbox that Actionstep will use.
- Known Configuration Templates: These are known settings for email providers. If you see your provider listed please select it and this will populate some of the important fields below. If you do not see your service / provider listed, or you're not sure, please leave these settings as blank and we will configure them manually.
- Server Information:
- Incoming Mail Server (POP3): in the gmail settings above the Incoming Mail (POP3) Server in this example is pop.gmail.com
- Outgoing Mail Server (SMTP): in the gmail settings above Outgoing Mail (SMTP) Server in this example is smtp.gmail.com
- Login Information: This is the username and password used to access the mailbox. Usually the email address is the same as the username but this isn't always the case.
- My outgoing server (SMTP) requires a different password: Check this if you know your Outgoing Mail Server requires a different username / password to the one used for the Incoming Mail Server. You will be prompted to enter the different details.
- Port Settings: These are listed with the configuration details. In this example the Incoming Mail Server Port is 995 and SSL is required. The Outgoing Mail Server Port is 465 for SSL. Please note: Actionstep does not allow email connections to the Outgoing Mail Server on Port 25 for security reasons.
- Test Settings: Click these buttons to test that the configuration is correct. If you get a failure there should be a message explaining what to do to get a successful test, please contact support@actionstep.com should you have any queries regarding this.
- Advanced Settings: This menu is hidden by default - only change these settings if you know you need to change them.
- This is a wildcard / catch-all mailbox: Set this to True if you have a Wildcard mailbox. Don't worry if you don't know or are unsure - just leave this set to False.
- Fallback Email Address: This is the email address that Actionstep will forward any email that is unassigned (not able to automatically be allocated to an action/matter or contact) to. This can be left blank or can be set to a different email address to the email address above. All unassigned email stays in Actionstep in the Unassigned mailbox at all times so this setting is not always necessary to use.
- Catch-All Header: Change this setting if you are having trouble with your Wildcard / Catch-all mailbox.
- Internal Routing: This sets whether or not to send emails that Actionstep knows about (existing system user email addresses) to the outside world via the Outgoing Mail Server (SMTP) or to deliver into the user's Actionstep Email Inbox.
- Signature and Disclaimer
- Division Signature: This is the signature that will appear at the bottom of all emails unless a user already has a unique signature set in their email preferences.
- Division Disclaimer: This is the legal disclaimer attached to all outgoing emails.
Once you are happy with the configuration press the save button and Actionstep will start checking the Actionstep Mailbox for incoming emails and you will be able to send emails from within Actionstep.
Notes
If you have issues with your Outgoing Mail Server (SMTP) you can use the Actionstep SMTP servers (available in the Known Configuration section). When using the Actionstep SMTP servers you will need to update your SPF record in your DNS listings. For details on what to change see Spam Filter Settings below.
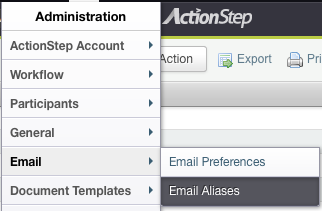
Email Aliases
Here you can setup the email aliases and their corresponding users within ActionStep:
Spam Filter Settings
If you use ActionStep's SMTP servers to send mail then you need to register these IP addresses in the SPF settings of your DNS configuration to prevent your outgoing emails being marked as spam. Update your SPF or Sender-ID record to include the following:
v=spf1 a mx ptr include:_spf.actionstep.com ~all
If you already have an existing SPF record, simply amend it with:
include:_spf.actionstep.com
Email Size Limits
The mail size limit will depend on the route that the message takes through the Internet and the capabilities of the mail servers on each end. Most mail servers will handle messages up to 10MB and, even though ActionStep can handle larger messages, our recommendation is to stay within this limit to avoid unpredictable results. This applies to email sent from, and received into, ActionStep.
Keep email messages under 10MB to avoid unpredictable results.
Setting Up a Wildcard Mailbox on Gmail / Google Apps
To setup a wildcard / catch-all address:
- Log in to your control panel.
- From the Service settings drop-down menu, select Email.
- Standard Edition Administrators: In the Catch-all address section, select the Forward the mail to: radio button..
- Non-Standard Edition Administrators: In the Email Routing section, select the Route to catch-all address: radio button.
- Enter the email address to which the mail should be forwarded. You must choose an email address on your domain.
- Click Save changes to activate the new address.
To disable your catch-all address:
- Log in to your control panel.
- From the Service settings drop-down menu, select Email.
- Standard Edition Administrators: In the Catch-all address section, select the Discard the email radio button.
- Non-Standard Edition Administrators: In the Email routing section, select the Discard radio button.
- Click Save changes to apply your selection.